Operating Instructions for
CHD Series Liquid Distribution Systems
Introduction
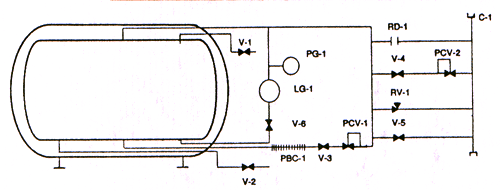
The container consists of an inner stainless steel cylinder securely supported in an outer jacket shell. The space between the inner and outer vessels contains a highly efficient insulation material and is evacuated.
Safety Devices
The inner liquid reservoir is protected by a relief valve (RV-1) and a rupture disc (RD-1) on the vent manifold.
A combination evacuation valve and relief device is provided to service the vacuum space. This protects the container in the event of a leak in the inner reservoir. If this device vents, contact Cryofab; do not attempt to use the container or re-evacuate the insulation space.
Gauges
A pressure gauge is provided indicating inner vessel pressure. A liquid level gauge is provided to indicate approximate container contents. A liquid level gauge isolation valve (V-6) is located behind the gauge panel. This valve allows the liquid level gauge to be serviced even if there is still liquid remaining in the tank; it should be open during normal operation.
Pressure Control
The pressure control for this container is achieved via the road relief regulator (PCV-2) and the road relief isolation valve (V-4), arranged in series on the vent manifold. The road relief regulator functions as an adjustable relief valve to limit the working pressure of the vessel. This regulator is preset at the factory but can be adjusted in the field, according to different needs. To lower the setting, turn the adjusting screw counterclockwise. To raise the setting, turn clockwise.
Pressure Building System
This container is equipped with an integral pressure building system to aid in liquid withdrawal. The pressure-building system consists of the pressure- building coil (PBC-1), the pressure-building valve (V-3, located at the bottom right) and the pressure-building regulator (PCV-1, located at the bottom of the vent manifold) all connected in series.
The pressure-building regulator maintains a preset vessel pressure during liquid withdrawal, as long as a sufficient liquid supply is in the container and the pressure-building valve is open. If a different pressure setting is required, the pressure-building regulator can be adjusted. To lower the setting turn clockwise. To avoid wasting liquid, the pressure-building regulator should be set approximately 5 PSI lower than the road relief regulator.
Filling
These containers can be filled from a pressurized liquid source using the following procedure: Attach an extension to the full trycock valve (V-1, located top right) and orient it so that the discharge is directed away from personnel and out of van compartment. Connect the liquid source to the fill/withdrawal valve, (V-2, labeled liquid) using a suitable transfer line. Be sure the vent valve (V-5) and the road relief isolation valve (V-4), both located on the vent manifold, are closed. Open the full trycock valve and the fill/withdrawal valve. To begin the transfer, open the liquid source valve.
Warning
A cold stream of gas or liquid will exit from the full trycock extension. Keep clear of exiting stream.
When the container is filled to maximum capacity, liquid will start to exit from the full trycock. At that point, shut off the liquid source valve. (Consult DOT regulations or your local liquid supplier for the maximum allowable liquid load consistent with your working pressure). Shut off the fill/withdrawal valve and the full trycock valve. Disconnect the transfer line and the full trycock extension (if necessary). Open the road relief isolation valve (V-4) to limit the operating pressure of the vessel to the desired setting.
Withdrawal
Transferring liquid from the container is accomplished by the following procedure. Be sure the vent valve (V-4, located on the vent manifold) is closed and check the pressure gauge to see that the vessel pressure is adequate for the intended application. If additional pressurization is required, open the pressure-building valve (V-3) to operate the integral pressure-building coil (PBC-1). With the pressure-building system functioning the preset pressure will be maintained throughout the withdrawal, as long as a sufficient liquid supply is present.
Attach a suitable transfer line to the fill/withdrawal valve (V-2). Open the fill/withdrawal valve as far as necessary to obtain the desired flow rate. When the transfer is complete, close the fill/withdrawal valve and disconnect the transfer line. The pressure-building valve may be left open, if desired. This may, to a limited extent, determine the operating pressure of the vessel until the liquid is saturated. After that point, the road relief regulator becomes the limiting device for the operating pressure.
WARNING
Do not operate this vessel in a closed compartment or confined area unless the vent stack is ducted to the outside. Do not open the fill/withdrawal or the full trycock valve if in a confined area.
WARNING
All transfer lines used with this vessel should be equipped with a relief valve.
Changing Service
CHD series are suitable for carrying liquid oxygen, nitrogen or argon, however, if changing service, purge according to DOT regulations. Minor component changes may be necessary.
Caution
Before operating this vessel, please read thoroughly, PRECAUTIONS FOR THE SAFE HANDLING AND STORAGE OF LIQUEFIED GASES included with these instructions, for additional precautions and good practice regarding cryogenics.
Replacement Parts and Accessories
Click here to purchase replacement parts and accessories including valves, gauges and rupture discs.
VIEW/PRINT MANUAL